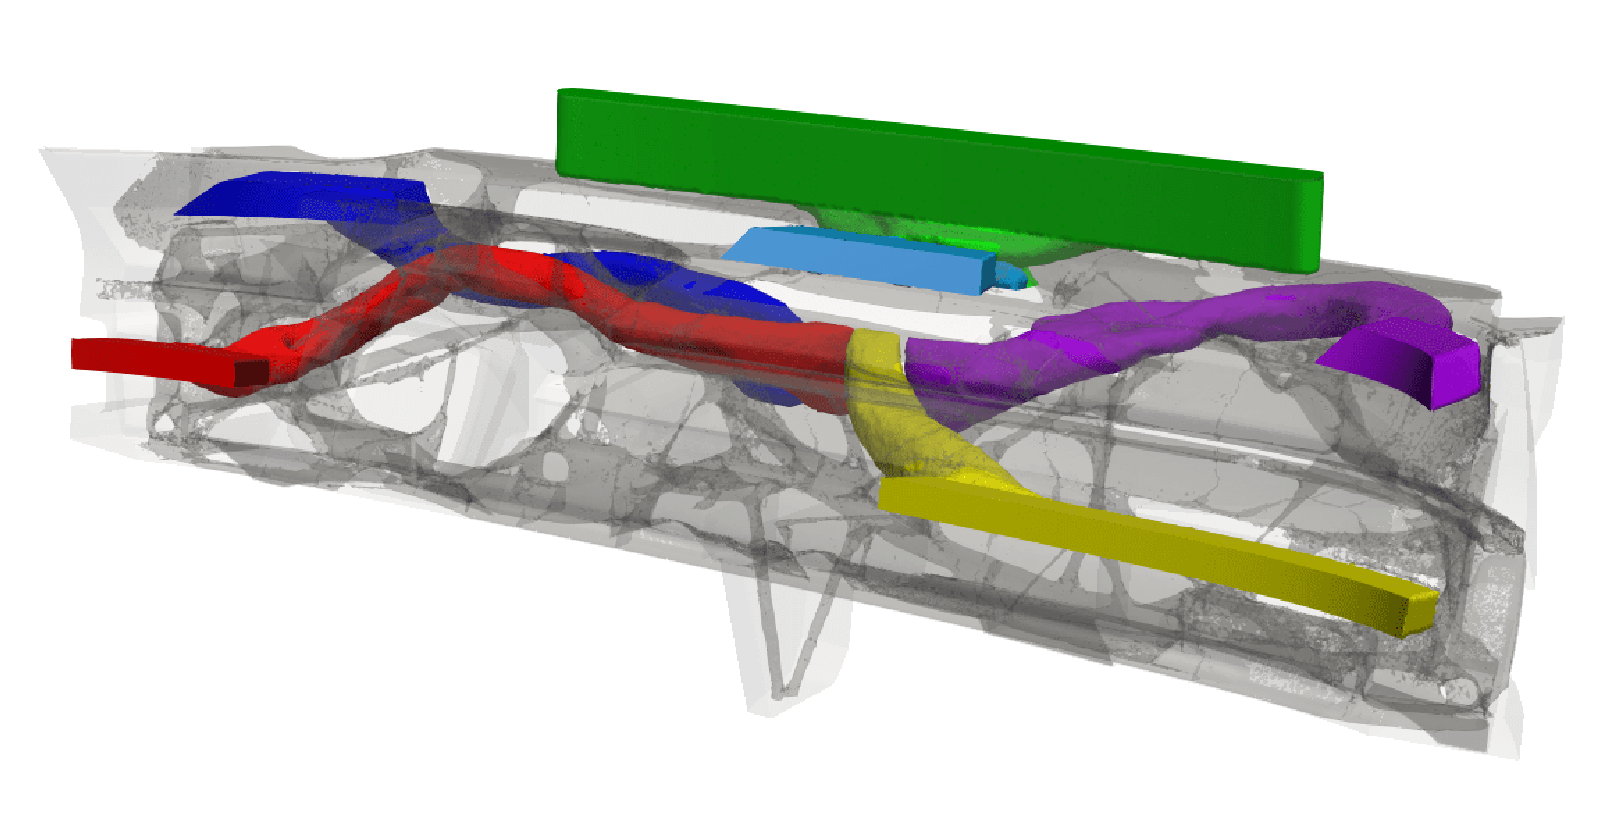
In the previous post about multipoint adjoint optimisation I showed the concept and process of our recent developments in this field on a very simple demonstration case (Definitely read this before you continue!).
We now have received permission by our partner Volkswagen AG to show the original case that sparked this development. I will introduce you to the case and explain what’s going on during the setup and optimisation process.
The Problem
Passenger comfort in vehicles is an important aspect for car manufacturers and thermal comfort plays a major role in that. The climatisation system in a car conditions the air (temperature, humidity) and distributes it to the cabin through a network of ducts to achieve the desired effect (cool head, warm feet, for example).
The central part that conditions the air sits somewhere between the engine and the dashboard and, through flaps that the passenger controls, directs the air into the various distribution ducts. (It’s apparently not a very sexy part of a car, so I couldn’t find any freely available pictures. Do a web search for “car heater box” or “car blower box” and you will get the idea.) The distribution ducts are the parts that we are interested in. They have the task to take the air from the air conditioning box and route it to the cabin air outlets, the ones you can actually see in your car. The challenges faced by the engineer are to design a duct network that has a small pressure drop, can be routed through a maze of other vehicle components and structures and is easy to manufacture and assemble. Ideally, it should also provide uniform flow to the cabin air outlet.
So, this is a perfect task for adjoint topology optimisation, although we had to develop additional functionality. Since the air flow rates that go into the ducts to the cabin air outlets are controlled inside the air conditioning box, we cannot allow the individual ducts to merge with each other. Traditionally, we could optimise for each duct separately. But this creates the problem of which duct to optimise first, as it would then act as an additional obstacle to the next duct to be optimised, and so on. The first duct would get all the good design space and the last duct would only get the leftovers. So, we want to design all the ducts at the same time and make sure they do not intersect each other. Furthermore, the air conditioning system works with different flow rates. Depending on what the driver or the passenger selects for blower speed and configuration, the duct network has to deliver either lower flow rates or higher flow rates or even have certain ducts being closed off completely. This also has to be taken into account during the optimisation process.
The Case
Its about time to show the actual case. There is an animation that goes through the whole process further down, but I will explain each step in more detail first.
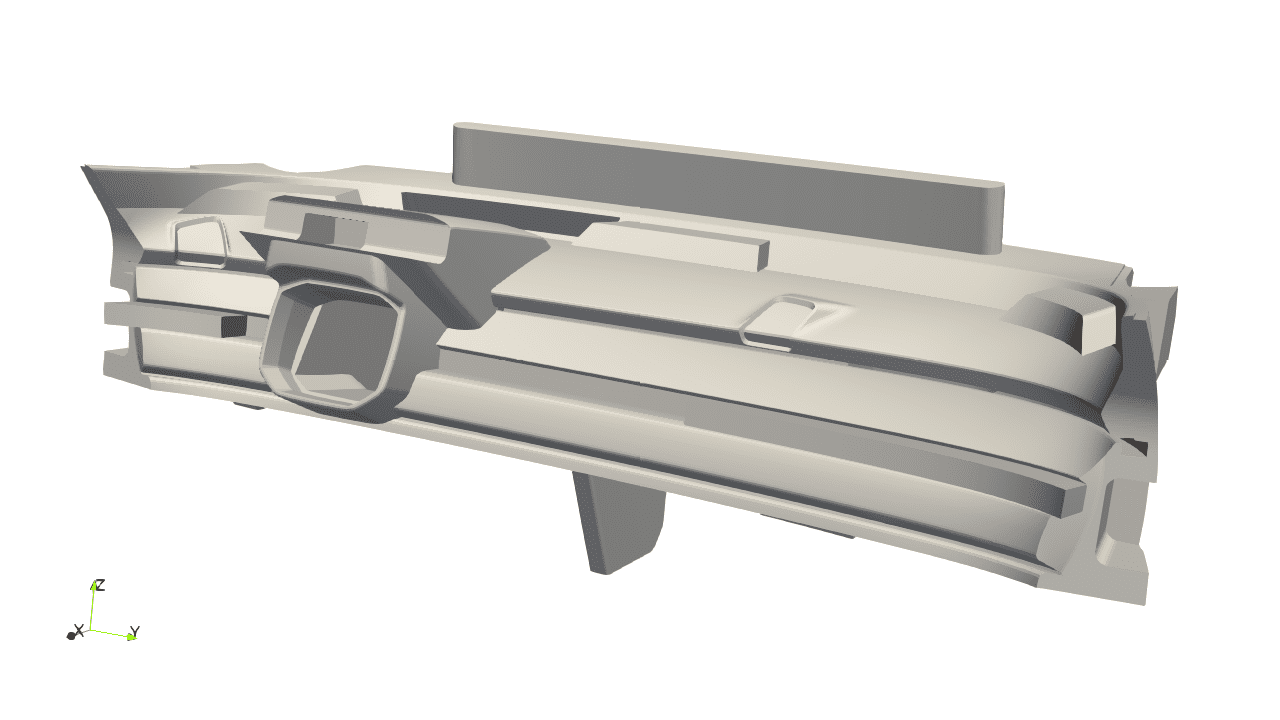
(with kind permission of Volkswagen AG)
Here you see the design space given and the form of the dashboard is clearly visible. Almost all this space is given to the adjoint solver to do its thing in.
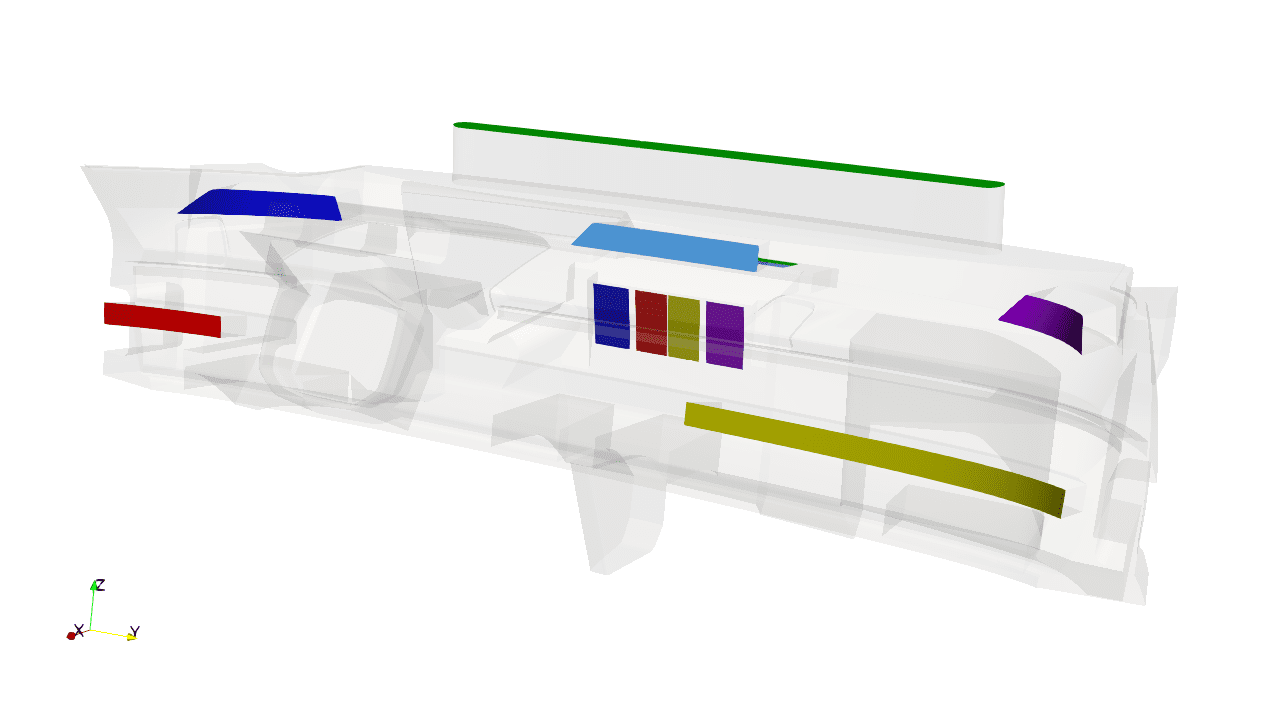
(with kind permission of Volkswagen AG)
Next, you see the boundary conditions, colour coded. There are four central inlets (CFD inlets) blue, red, yellow, purple and additionally two inlets located near the windshield, light blue & green. Each of those inlets has an outlet assigned to it, the cabin air outlets. You can see that the actual detailed shape of the air outlet is not modelled, instead the mesh is a bit extruded into the cabin. The pairing of the inlets to the outlets is given by the design of the flaps inside the air conditioning unit and is not part of this simulation, i.e. it cannot be changed. But the pairing is quite logical. So, the blue inlet needs a duct that connects it to the blue outlet, and so on. All together, we are looking at 6 separate ducts. But we are also looking at 3 different flow settings & configurations. Configuration A has 5 active ducts at low flow rate, the green windshield defroster is closed; configuration B is similar but with a high flow rate; configuration C has just the green inlet outlet pair active with all other ducts inactive.
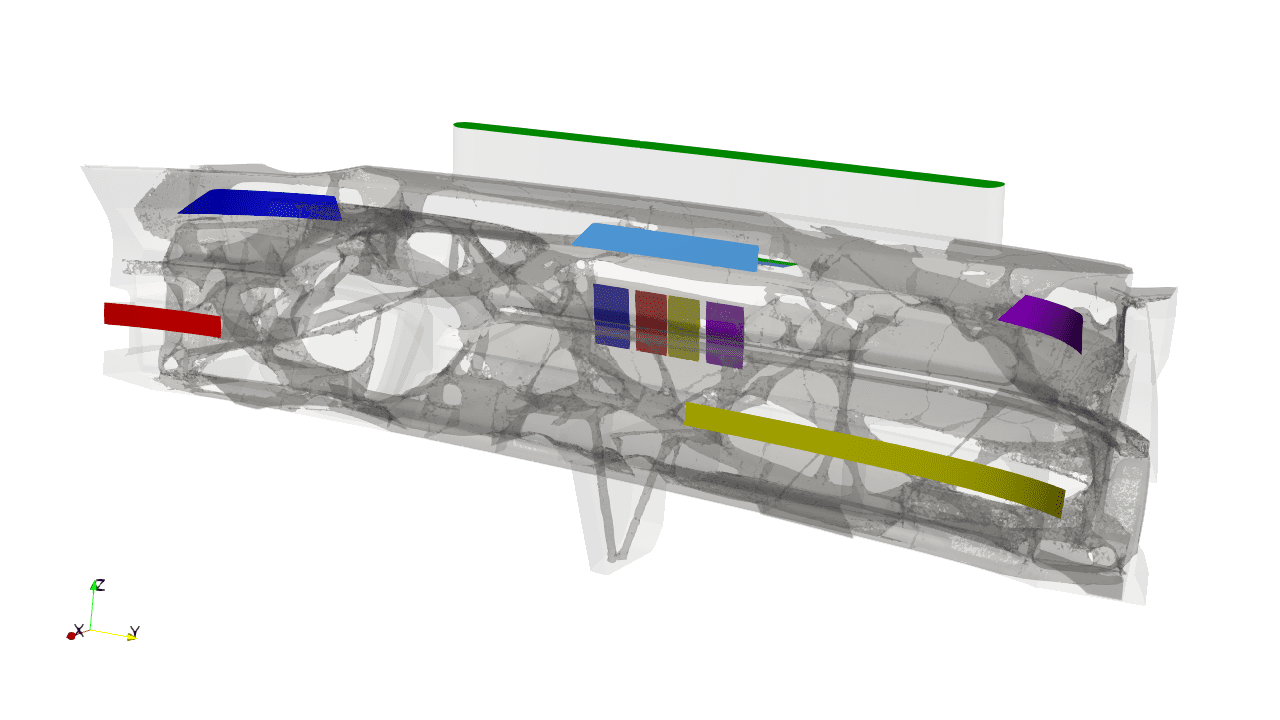
(with kind permission of Volkswagen AG)
Carrying on, we get an additional challenge. A structural topology optimisation was done beforehand on the same computational mesh and created the now visible internal structures. All this structure needs to be navigated around by the forming ducts.
On top of that we aim for small ducts, by trying to minimize the volume each duct occupies. This is a good way to ensure, shapes are simple and rounded and, thus, can be manufactured.
And then the optimisation starts. Initially all 6 ducts occupy the complete design space. But as they try to i) minimize their pressure loss, ii) form small volume shapes and iii) get out of each other’s way, a solution is reached in the end.
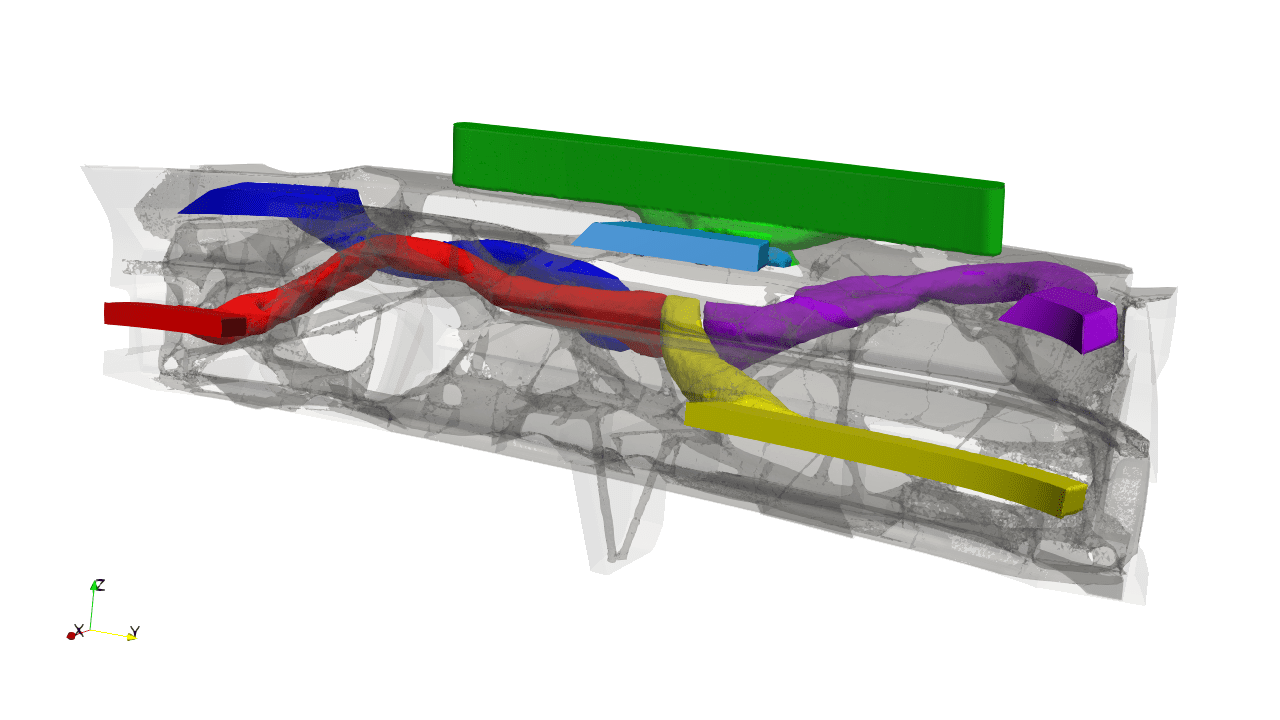
(with kind permission of Volkswagen AG)
THE SUMMARY
To summarise, the optimisation problem has to deal with 5 pressure loss objectives for low flow (Config A), 5 pressure loss objectives for high flow (Config B), 1 pressure loss objective for the defrost ducts (Config C). Additionally, we added flow uniformity at the outlet as another optimisation objective for the light blue duct and the green defrost duct, giving another 3 objectives. All ducts must reduce their volumes (6 objectives) and get out of each other’s way (6 objectives). That brings the number of concurrent optimisation objectives to 26. Quite impressive, considering that it’s all done in a single simulation!
If you are interested to learn more or think this functionality can help you in your design process, the method is readily available in our HELYX-Adjoint module. Feel free to contact us or drop a comment below.

